PRINTING TO OUR COPIERS WITH OUR PAPERCUT SYSTEM 2020
(School Owned and Personal Devices)
___________________________________________________
A
School owned Devices
1). Windows operating system on our computer network/domain
By default the copiers (secure_print on print) should be installed on your computer if not contact IT.
2). Chrome operating system (Chromebooks) on our computer network/domain
All Granville owned chromebooks will have the secure_print on print mobility printer as an option if not contact IT. You will need to select it in the print dialogue.
To select printer in the print dialogue on the chromebook click on see more in the printer area and select “Secure_Print on print” as the printer.
The chromebooks have to be on site , on our network to print to our copiers.
The first time a person prints it will ask for a login and password , it is the granville login. Just username ( no @school.org or @gm.school.org). The “remember” checkbox is checked by default and they should not have to do that again on that chromebook.
If the chromebook has not been turned on in a week or two and is “just turned on” it might take a while for the papercut mobile print app to install.
The print job is then securely released at the copiers using the students lunch number or badge number (for staff).
3).MAC operating system bound to our domain
Using the System Prefs pane
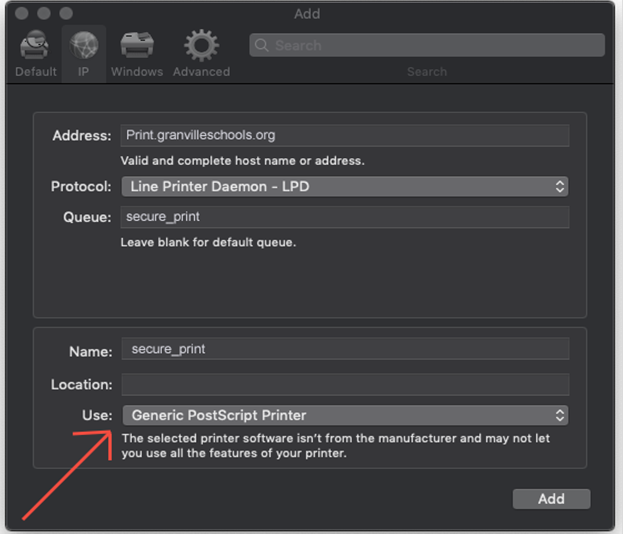
1. Go to System Preferences > Printers and Scanners > + (plus sign)
2. Here, go to the IP tab and choose “Line Printer Daemon – LPD.”
3. Populate the Address field with print.granvilleschools.org.
4. Populate the Queue field with secure_print
5. Add the share name secure_print to the Name field as well.
6. Choose the appropriate model-specific driver using the Use drop-down bar and set to a Konica Minolta Bizhub 808 if something like that is installed. Alternatively, choose the Generic PostScript option to keep things simple for printers that don’t support advanced finishing options like stapling.
B
Personal devices (non-school owned)
| Windows | macOS | iOS | Android | Chrome OS |
click links above for setup instructions.
1). Personal Windows operating system on our computer network/domain
online instructions here https://www.papercut.com/support/resources/manuals/mobility-print/mobility-print-devices/topics/en/client-setup-windows.html
Download and install the Mobility Print Installer for windows from here. https://www.papercut.com/support/resources/manuals/mobility-print/mobility-print-devices/topics/en/client-setup-windows.html

Click ok
Read and Accept the user agreement and click next
Select Secure_print [print] as the printer you want to add to windows.

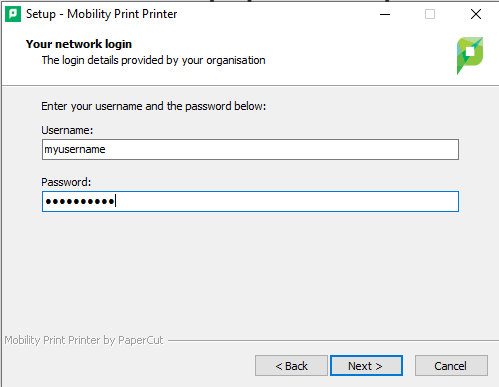
When asked for login use Granville username (no @granvilleschools.org) and Granville password.
When it’s time to print, just print like you normally do. Be sure to use a printer you selected when you installed Mobility Print.
2). Chrome operating system (Chromebooks) on our computer network/domain
Install the mobility print app from the chrome web store https://chrome.google.com/webstore/detail/mobility-print/alhngdkjgnedakdlnamimgfihgkmenbh?hl=en
User your username (no granvilleschools.org) and your School password to login to mobility print.
When it’s time to print, just print like you normally do. Be sure to use a printer you selected when you installed Mobility Print.
3). MAC operating system on our computer network/domain
online instructions here https://www.papercut.com/support/resources/manuals/mobility-print/mobility-print-devices/topics/en/client-setup-macos.html
Navigate to System Preferences > Printers and Scanners.
- Click the
 icon under the Printers List.
The Add dialog is displayed. It displays a list of all of the discovered printers on the network.
- Select a printer that uses the Bonjour protocol. The Name, Location, and Use is displayed.
- At the bottom of the dialog box, check that Use is set to Secure AirPrint.
- If Secure AirPrint isn’t displayed:
- Close the Add dialog.
- Disconnect from the network, then reconnect to it again.
- Check if you can see Secure AirPrint now. If you can’t, contact your System Administrator.
- Click Add.
- Print your document. When prompted, enter your PaperCut username and password.
NOTE
- If you’re not sure how to print from your application, take a look at Print from your Mac.
- If you enter the wrong authentication details, MacBook devices do not show any warning message; your job just will not print.
- If your job doesn’t print, check the Print Queue dialog. If the print job is there and has the message Held for authentication, click the
 icon; then re-enter your login details.
 - Need to assign an account to your print job? You can do that at the printer or via the User Client.